WebThings Gateway
บทความ WebThings Gateway เป็นบทความเกี่ยวกับการสร้างเว็บไซต์สำหรับควบคุมอุปกรณ์ IoT ของตัวเองโดยใช้บอร์ด Raspberry Pi (บอร์ดคอมพิวเตอร์ขนาดเล็กเท่าบัตรเครดิต) เป็น Gateway ของอุปกรณ์ IoT ไม่จำเป็นต้องเขียนโปรเเกรมให้ยุ่งยาก จัดการส่วนต่างๆด้วยการลากวางเท่านั้น รายละเอียดในบทความนี้จะเเบ่งเนื้อหาออกเป็น หลายๆส่วน ซึ่งจะเเยกออกบทความหลายบท เพื่อจะไม่ให้เนื้อหาในเเต่ละบทนั้นยาวเกินไป โดยจะประกอบด้วย
- บทความ WebThings Gateway ตอนที่ 1 สร้างเว็บไซต์ IoT ด้วย WebThings Gateway
- บทความ WebThings Gateway ตอนที่ 2 ใช้งาน Add-ons ต่างๆ บน WebThings Gateway
- บทความ WebThings Gateway ตอนที่ 3 ใช้งาน Rule เเละ Log ข้อมูล
- บทความ WebThings Gateway ตอนที่ 4 ส่งข้อมูลจากบอร์ด ESPino32 ไปยัง WebThings Gateway
- บทความ WebThings Gateway ตอนที่ 5 รับข้อมูลจาก WebThings Gateway มาควบคุมการทำงานบนบอร์ด ESPino32
หลังจากรู้จักกับ WebThings Gateway เเละ เรียนรู้การใช้งานเบื้องต้นบนบอร์ด Raspberry Pi ไปแล้ว เนื้อหาภายในบทความนี้จะเพิ่มในส่วนของการนำบอร์ดที่มี Wi-Fi เพื่อสร้างเป็น IoT Devices สำหรับส่งข้อมูลไปยัง WebThings Gateway โดยภายในบทความนี้จะอ้างอิงบอร์ด ESPino32 ซึ่งเป็นบอร์ดไมโครคอนโทรเลอร์ที่สามารถเชื่อมต่อ Wi-Fi ได้
ในบทความนี้จะเป็นขั้นตอนสำหรับนักพัฒนาซึ่งมีขั้นตอนเพิ่มเข้ามาจากการใช้งานในตอนเเรกพอสมควร และบางส่วนของเนื้อหาจะเป็นการพัฒนาโปรเเกรมบนเเพลตฟอร์ม Arduino ดังนั้นผู้ใช้งานควรมีพื้นฐานการใช้งาน Arduino บ้าง หรือหากสนใจสามารถศึกษาจากบทความที่เกี่ยวข้องได้ตามลิงค์ดังนี้
สิ่งที่ควรทราบสำหรับการสร้าง Things Devices
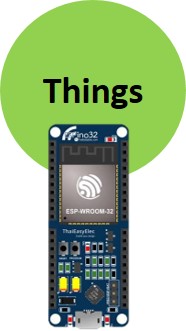
things
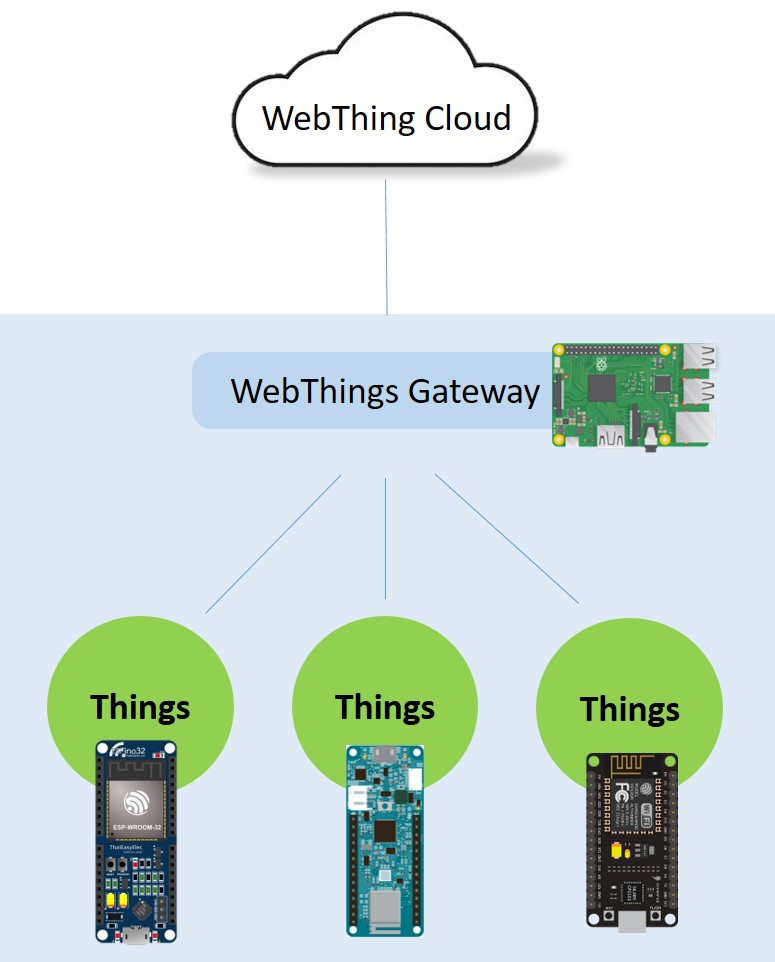
สำหรับการสร้าง Things Devices หรือ IoT Devices ของเรานั้น สิ่งเเรกที่ควรคำนึงถึงคือตำเเหน่งของ things device ในระบบ ซึ่งจากรูป things แสดงให้เห็นว่า things devices อยู่ลำดับถัดจาก WebThings Gateway ซึ่งการพัฒนาโปรเเกรมสำหรับสร้าง Things Devices เพียงอย่างเดียวจะไม่สามารถ เชื่อม Things Devices เข้ากับ WebThings Cloud ได้
ขั้นตอนการสร้าง Things
- สร้าง Things Devices
- เชื่อมต่อ Things Devices เข้ากับ WebThings Gateway เพื่อให้ WebThings Cloud รู้จักกับตัว Things Devices
รายละเอียดของ Things
ก่อนจะเริ่มสร้าง Things Devices เรามารู้จักกับโครงสร้างเบื้องต้นของ Things Devices ก่อน เพื่อที่จะเป็นความรู้พื้นฐานสำหรับการประยุกต์ใช้งานตามรูปแบบที่ผู้ใช้ต้องการ โดยจะยกให้เห็นโครงสร้างง่ายๆ ด้วย Basic Things Devices ดังรูป ส่วนประกอบของ Thing
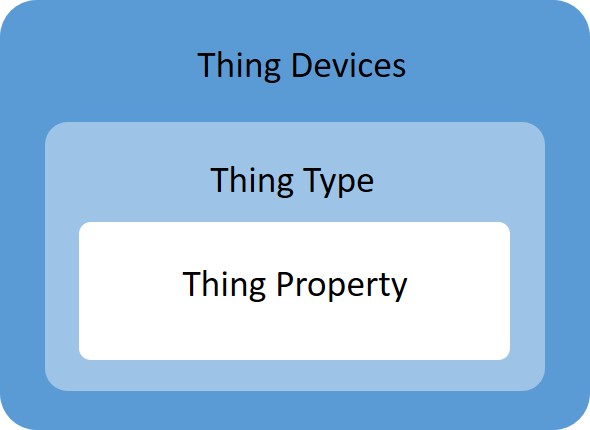
ส่วนประกอบของ Thing
ส่วนประกอบของ Things ประกอบไปด้วย 3 ส่วนคือ
- Things Devices คือ อุปกรณ์ ตัวอย่างเช่น บอร์ด ESPino32 1 ตัวคือ 1 Things เป็นต้น
- Things Type คือชนิดของ Things ซึ่งเป็นส่วนที่จะเเสดงในหน้าเว็ปไซต์ของ WebThings ตัวอย่างเช่น OnOffSwitch, PushButton, MultiLevelSwitch เป็นต้น
- Things Property คือคุณสมบัติของ Things Type ซึ่งเป็นส่วนแสดงผลในหน้าเว็บไซต์ของ WebThings
หลังจากเห็นโครงสร้างของ Basic Things Devices ไปเบื้องต้นเเล้ว ในการใช้งานผู้ใช้งานอาจต้องการสร้างฟังก์ชันที่หลากหลายบน Things Devices เดียวเพื่อให้เกิดความคุ้มค่าสูงสุดอาจพิจารณาสร้าง Things Devices แบบ multi Things Type หรือ แบบ multi Things Property ตามความต้องการ
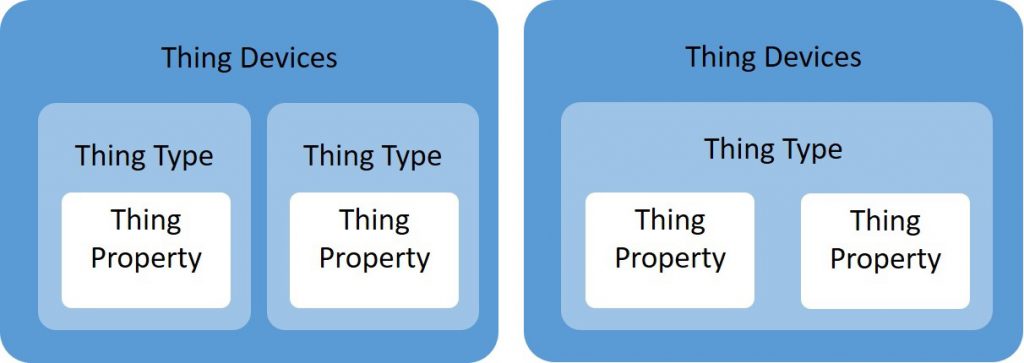
Things Devices แบบ multi Things Type หรือ แบบ multi Things Property
อุปกรณ์ใช้ภายในบทความ
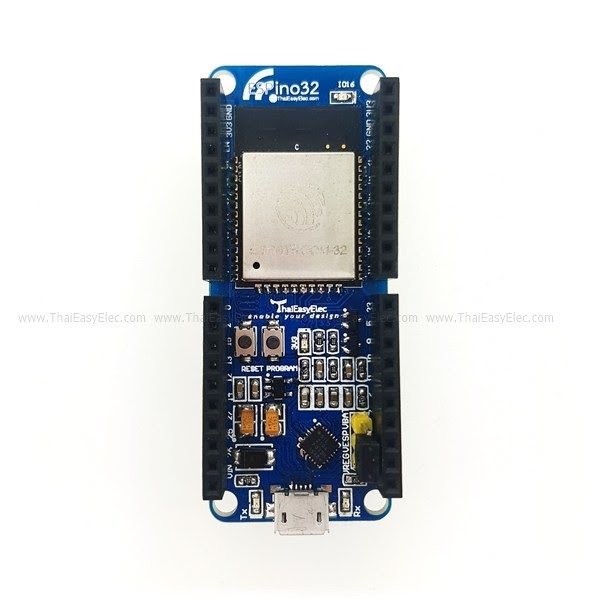
- 1. ESPino32 Wifi BLE Development Board (ETEE061S) จำนวน 1 pcs บอร์ดไมโครคอนโทรลเลอร์พร้อมโมดูลสื่อสาร Wireless LAN และ Bluetooth ใช้โมดูล ESP-WROOM-32 จาก Espressif Systems เป็นไมโครคอนโทรลเลอร์ขนาด 32-bit สามารถนำไปประยุกต์ใช้งานในโครงงานอิเล็กทรอนิกส์ได้อย่างหลากหลาย
- 2. Button Switch Module (EACC085) ปุ่มกดแบบกดติดปล่อยดับ สีเขียว ขนาด 2 x 2.5 x 1.5 cm มีตัวต้านทานขนาด 10 กิโลโอห์มต่อแบบ Pull-up อยู่ภายใน รองรับการใช้งานแรงดัน 3.3 และ 5 โวลต์

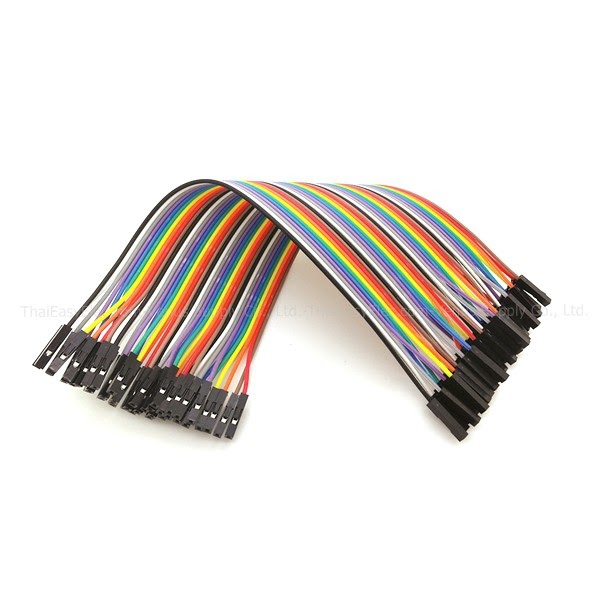
- 3. Female to Female Cable Jumper Wire 40 Pins (เมีย-เมีย) (ELNK051) จำนวน 1 pcs สาย Jumper Wire แบบสายแพ สามารถฉีกออกเป็นเล็กได้ 40 เส้น ความยาวสาย 20 cm ปลายทั้ง 2 ด้านเป็นหัว header ตัวเมีย
ติดตั้งไลบรารี่ที่เกี่ยวข้อง (ดูการติดตั้งไลบรารี่เพิ่มเติมได้ที่ Link)
ตัวอย่างการสร้าง IoT Device ส่งข้อมูลสถานะปุ่มกดไปยัง Webthings
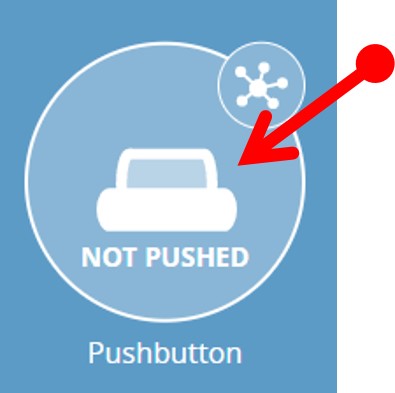
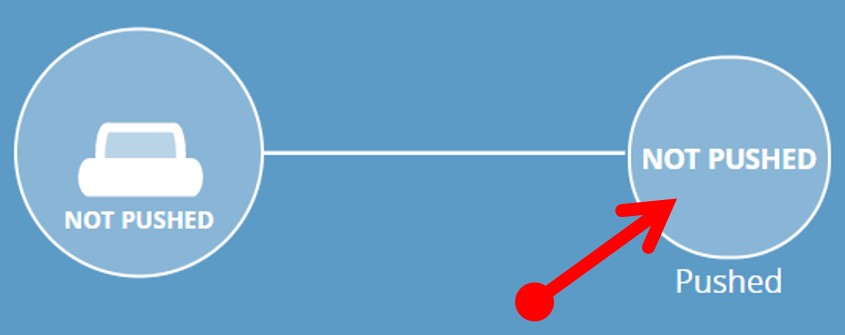
ตัวอย่างแรกจะนำบอร์ด ESPino32 มาสร้างเป็น IoT Devices โดยตัวอย่างนี้เป็นการส่งสถานะการกดปุ่มที่ต่ออยู่กับขา GPIO ของบอร์ด ESPino32 ไปแสดงผลยัง WebThings ดังรูป WebThings แสดงสถานะการกดปุ่ม
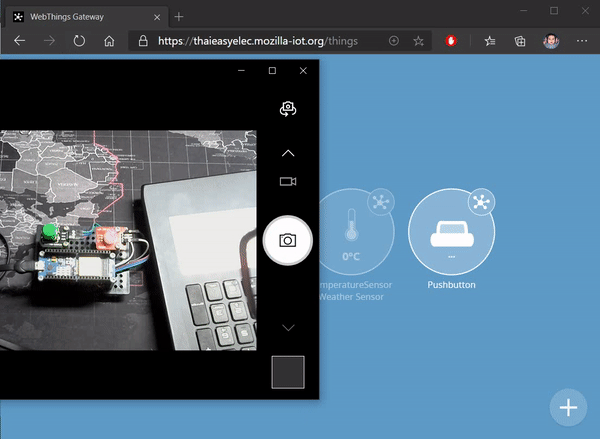
WebThings แสดงสถานะการกดปุ่ม
วงจรที่ใช้
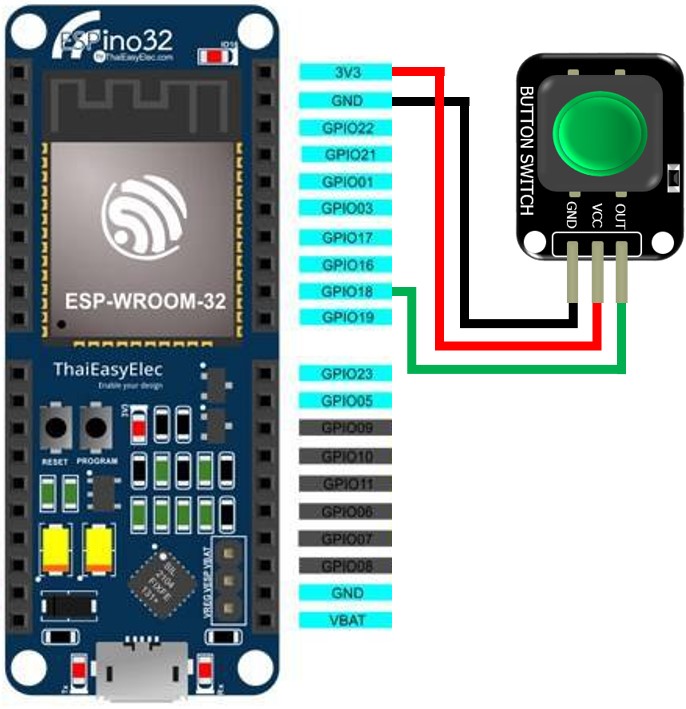
ESPino32 ใช้งาน Button Switch
โปรเเกรมที่ใช้
#include <Arduino.h>
#include "Thing.h"
#include "WebThingAdapter.h"

const char *ssid = "YOUR_SSID_NAME";
const char *password = "YOUR_SSID_PASSWORD";

const int ledPin = 16;
const int buttonPin = 18;

WebThingAdapter *adapter;

const char *PushButtonTypes[] = {"PushButton", nullptr}; // define a type of device referenc to context https://iot.mozilla.org/schemas/#properties
ThingDevice Pushbutton("PushButton", "Pushbutton", PushButtonTypes); //configure device id, name and type
ThingProperty PushbuttonOn("push", "button is pressed", BOOLEAN, "PushedProperty"); // device property of device, name, text, boolen type


void setup(void) {
  pinMode(ledPin, OUTPUT);
  pinMode(buttonPin, INPUT);
  digitalWrite(ledPin, HIGH);

  Serial.begin(115200);
  Serial.println("");
  Serial.print("Connecting to \"");
  Serial.print(ssid);
  Serial.println("\"");
  WiFi.mode(WIFI_STA);
  WiFi.begin(ssid, password);
  Serial.println("");

  // Wait for connection
  bool blink = true;
  while (WiFi.status() != WL_CONNECTED) {
    delay(500);
    Serial.print(".");
    digitalWrite(ledPin, blink ? LOW : HIGH); // active low led
    blink = !blink;
  }
  digitalWrite(ledPin, HIGH); // active low led

  Serial.println("");
  Serial.print("Connected to ");
  Serial.println(ssid);
  Serial.print("IP address: ");
  Serial.println(WiFi.localIP());
  adapter = new WebThingAdapter("pushbutton", WiFi.localIP());

  Pushbutton.addProperty(&PushbuttonOn);
  adapter->addDevice(&Pushbutton);
  adapter->begin();
  Serial.println("HTTP server started");
  Serial.print("http://");
  Serial.print(WiFi.localIP());
  Serial.print("/things/");
  Serial.println(Pushbutton.id);
}
bool buttonState = false;
void loop(void) {
  ThingPropertyValue value;
  buttonState = digitalRead(buttonPin);
  if (buttonState == LOW)
  {
    value.boolean = true;
    Serial.println("pushed");
  }
  else
  {
    value.boolean = false;
    Serial.println("not pushed");
  }
  PushbuttonOn.setValue(value);
  adapter->update();
  delay(100);
}
หลังจากอัพโหลดโปรแกรมแล้ว เปิด Serial Monitor ของโปรเเกรม Arduino การทำงานของโปรเเกรมนี้คือเริ่มต้นไฟ LED BUILTIN ของบอร์ดจะกระพริบจนกว่าจะต่ออินเทอร์เน็ตได้ จากนั้นโปรเเกรมจะเเสดงลิงค์ของเว็บไซต์ขึ้นมาดังรูป Link ของ Things
Link ของ Things
จากนั้นคัดลอง Link ดังกล่าวไปยัง WebThings Gateway ดังรูป เพิ่ม Button Widget
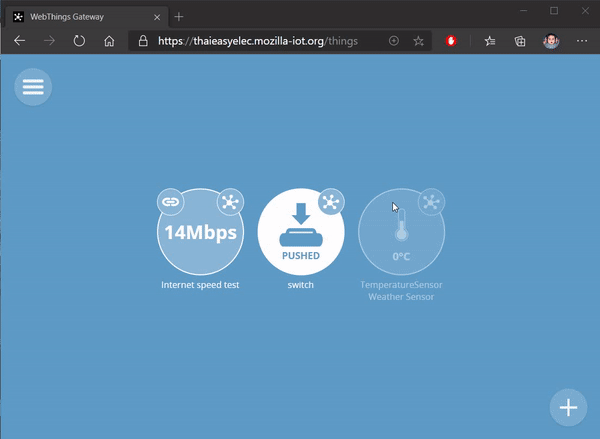
เพิ่ม Button Widget
ทดลองใช้งาน ดังรูป WebThings แสดงสถานะการกดปุ่ม
WebThings แสดงสถานะการกดปุ่ม
ตัวอย่างการสร้าง IoT Device ส่งข้อมูลตัวเลขแบบสุ่มไปยัง WebThings
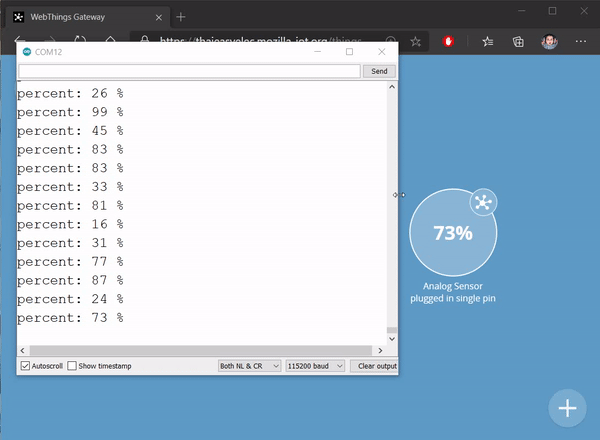
ตัวอย่างนี้จะนำบอร์ด ESPino32 มาสร้างเป็น IoT Devices โดยตัวอย่างนี้เป็นการส่งข้อมูล เป็นตัวเลข 0-100 แบบสุ่ม ไปแสดงผลยัง WebThings ดังรูป ส่งค่าตัวเลขแบบสุ่มไปยัง WebThings
ส่งค่าตัวเลขแบบสุ่มไปยัง WebThings
โปรเเกรมที่ใช้
#include <Arduino.h>
#include "Thing.h"
#include "WebThingAdapter.h"

const char *ssid = "YOUR_SSID_NAME";
const char *password = "YOUR_SSID_PASSWORD";

const int ledPin = 16;

const char *deviceTypes[] = {"MultiLevelSensor", "Sensor", nullptr};
ThingDevice device("AnalogSensorDevice", "Analog Sensor plugged in single pin", deviceTypes);
ThingProperty property("level", "Analog Input pin", NUMBER, "LevelProperty");
WebThingAdapter *adapter = NULL;

void setup(void) {
  pinMode(ledPin, OUTPUT);
  digitalWrite(ledPin, HIGH);

  Serial.begin(115200);
  Serial.println("");
  Serial.print("Connecting to \"");
  Serial.print(ssid);
  Serial.println("\"");
  WiFi.mode(WIFI_STA);
  WiFi.begin(ssid, password);
  Serial.println("");

  // Wait for connection
  bool blink = true;
  while (WiFi.status() != WL_CONNECTED) {
    delay(500);
    Serial.print(".");
    digitalWrite(ledPin, blink ? LOW : HIGH); // active low led
    blink = !blink;
  }
  digitalWrite(ledPin, HIGH); // active low led

  Serial.println("");
  Serial.print("Connected to ");
  Serial.println(ssid);
  Serial.print("IP address: ");
  Serial.println(WiFi.localIP());

  adapter = new WebThingAdapter("analog-sensor", WiFi.localIP());
  property.unit = "percent";
  device.addProperty(&property);
  adapter->addDevice(&device);
  adapter->begin();
  Serial.println("Starting HTTP server");
  Serial.print("http://");
  Serial.print(WiFi.localIP());
  Serial.print("/things/");
  Serial.println(device.id);
  delay(3000);
}

void loop(void) {
  int percent = random(0, 100);
  Serial.print("percent: ");
  Serial.print(percent);
  Serial.println(" %");

  ThingPropertyValue levelValue;
  levelValue.number = percent;
  property.setValue(levelValue);
  adapter->update();
  delay(1000);
}
หลังจากอัพโหลดโปรแกรมแล้ว เปิด Serial Monitor ของโปรเเกรม Arduino การทำงานของโปรเเกรมนี้คือเริ่มต้นไฟ LED BUILDTIN ของบอร์ดจะกระพริบจนกว่าจะต่ออินเทอร์เน็ตได้ จากนั้นโปรเเกรมจะเเสดงลิงค์ของเว็บไซต์ขึ้นมาดังรูป Link ของ level Thing
Link ของ level Things
จากนั้นคัดลอง Link ดังกล่าวไปยัง WebThings Gateway ดังรูป เพิ่ม Level Widget
เพิ่ม Level Widget
ทดลองใช้งาน ดังรูป ส่งค่าตัวเลขแบบสุ่มไปยัง WebThings
ส่งค่าตัวเลขแบบสุ่มไปยัง WebThings
ตัวอย่างการสร้าง IoT Device ส่งข้อมูลตัวเลขแบบสุ่มหลายค่าไปยัง WebThings
สำหรับ 2 ตัวอย่างแรกจะเป็นการทำงานแบบ 1 thing ต่อ 1 การเเสดงผล ซึ่งบางครั้งอาจจะไม่เพียงพอต่อความต้องการ ดังนั้นตัวอย่างนี้จะเพิ่มเป็น 1 thing ต่อ หลายการแสดงผล โดยใช้บอร์ด ESPino32 ส่งค่าตัวเลขแบบสุ่มจำนวน 2 ข้อมูลไปแสดงผลยัง WebThings
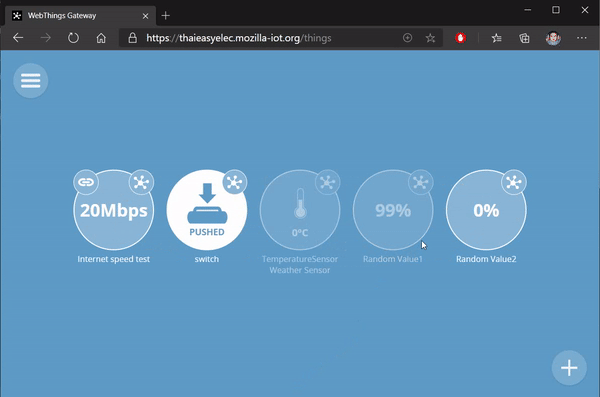
ส่งค่าตัวเลขแบบสุ่ม 2 จำนวนไปยัง WebThings
โปรเเกรมที่ใช้
#include <Arduino.h>
#include "Thing.h"
#include "WebThingAdapter.h"

const char *ssid = "YOUR_SSID_NAME";
const char *password = "YOUR_SSID_PASSWORD";

const int ledPin = 16;

const char *deviceTypes[] = {"MultiLevelSensor", "Sensor", nullptr};
ThingDevice device1("AnalogSensorDevice1", "Random Value1", deviceTypes);
ThingDevice device2("AnalogSensorDevice2", "Random Value2", deviceTypes);

ThingProperty deviceProperty1("level1", "Random Value1", NUMBER, "LevelProperty");
ThingProperty deviceProperty2("level2", "Random Value2", NUMBER, "LevelProperty");
WebThingAdapter *adapter = NULL;

void setup(void) {
  pinMode(ledPin, OUTPUT);
  digitalWrite(ledPin, HIGH);

  Serial.begin(115200);
  Serial.println("");
  Serial.print("Connecting to \"");
  Serial.print(ssid);
  Serial.println("\"");
  WiFi.mode(WIFI_STA);
  WiFi.begin(ssid, password);
  Serial.println("");

  // Wait for connection
  bool blink = true;
  while (WiFi.status() != WL_CONNECTED) {
    delay(500);
    Serial.print(".");
    digitalWrite(ledPin, blink ? LOW : HIGH); // active low led
    blink = !blink;
  }
  digitalWrite(ledPin, HIGH); // active low led

  Serial.println("");
  Serial.print("Connected to ");
  Serial.println(ssid);
  Serial.print("IP address: ");
  Serial.println(WiFi.localIP());

  adapter = new WebThingAdapter("analog-sensor", WiFi.localIP());

  deviceProperty1.unit = "percent";
  device1.addProperty(&deviceProperty1);
  deviceProperty2.unit = "percent";
  device2.addProperty(&deviceProperty2);

  adapter->addDevice(&device1);
  adapter->addDevice(&device2);
  adapter->begin();
  Serial.println("Starting HTTP server");
  Serial.print("http://");
  Serial.print(WiFi.localIP());
  Serial.print("/things/");
  Serial.println(device1.id);
  Serial.print("http://");
  Serial.print(WiFi.localIP());
  Serial.print("/things/");
  Serial.println(device2.id);
  delay(3000);
}

void loop(void) {
  int percent1 = random(0, 100);
  int percent2 = random(0, 100);
  Serial.print("percent: ");
  Serial.print(percent1);
  Serial.print("%");
  Serial.print("\t");
  Serial.print(percent2);
  Serial.println("%");

  ThingPropertyValue levelValue;
  levelValue.number = percent1;
  deviceProperty1.setValue(levelValue);
  levelValue.number = percent2;
  deviceProperty2.setValue(levelValue);
  adapter->update();
  delay(1000);
}
หลังจากอัพโหลดโปรแกรมแล้ว เปิด Serial Monitor ของโปรเเกรม Arduino การทำงานของโปรเเกรมนี้คือเริ่มต้นไฟ LED BUILDTIN ของบอร์ดจะกระพริบจนกว่าจะต่ออินเทอร์เน็ตได้ จากนั้นโปรเเกรมจะเเสดงลิงค์ของเว็บไซต์ขึ้นมา 2 ลิงค์ ดังรูป Link ของ multi Things
Link ของ multi Things
จากนั้นคัดลอง Link ดังกล่าวไปยัง WebThings Gateway ดังรูป เพิ่ม multi Level Widget

เพิ่ม multi Level Widget
ทดลองใช้งาน ดังรูป ส่งค่าตัวเลขแบบสุ่ม 2 จำนวนไปยัง WebThings
ส่งค่าตัวเลขแบบสุ่ม 2 จำนวนไปยัง WebThings
จากตัวอย่างการสร้าง Things ทั้ง 3 ตัวอย่าง จะเห็นได้ว่าเราสามารถสร้าง Things ขึ้นมาได้หลากหลายชนิดตามที่เราต้องการ และยังมีการเเสดงผลของ Things Type อีกหลายรูปเเบบที่บทความนี้ไม่ได้กล่าวถึง ยกตัวอย่างเช่น Things Type ของ Motion, Binary Sensor, Lock, OnOff, Open, Smoke, Temperature และอื่นๆอีกมากมาย (ดูเพิ่มเติมได้ที่ Link)
ในบทความถัดไปเป็นบทความที่มีเนื้อหาในการรับข้อมูลจาก WebThings Gateway โดยใช้บอร์ด ESPino32 เพื่อทำการสั่งงานหรือควบคุมอุปกรณ์นั้นๆ
>>> อ่านต่อ ตอนที่ 5 รับข้อมูลจากWebThings Gateway โดยใช้บอร์ด ESPino32 <<<
ขอขอบคุณข้อมูลอ้างอิงจาก
- https://iot.mozilla.org/framework/
- https://iot.mozilla.org/wot/#property-resource
- https://iot.mozilla.org/schemas/#