บทความการใช้งานเริ่มต้น ESP8266 NodeMCU และการใช้งาน Application ต่างๆ
ตอนที่ 2 วิธีเชื่อมต่อ NodeMCU เข้ากับระบบ Network
จาก ตอนที่ 1 เราได้ทำการติดตั้ง Arduino IDE และ ตั้งค่า Environment ต่างๆไปแล้ว และได้ทดลองใช้งาน Example Hello Server ซึ่งเป็นตัวอย่างการสร้าง Webserver แบบง่ายๆ ไปแล้ว ในตอนที่ 2 นี้เรามาลองดู Function ต่างๆที่ใช้สำหรับเชื่อมต่อ ESP8266 เข้ากับ Access point ซึ่งเป็นคำสั่งพื้นฐานสำหรับการใช้งานในส่วนอื่นๆต่อไป
Function สำหรับเชื่อมต่อกับ AP
void mode(WiFiMode)
เป็น Function สำหรับเลือกโหมดการทำงานให้ ESP8266 โดยมีอยู่ด้วยกัน 3 โหมด ได้แก่ Station, Access Point, Station และ Access Point
Parameter
WIFI_STA = สั่งให้ทำงานเป็น Station
WIFI_AP = สั่งให้ทำงานเป็น Access Point
WIFI_AP_STA = สั่งให้ทำงานเป็นทั้ง Station และ Access Point
int begin(const char* ssid, const char *passphrase)
เป็น Function สำหรับเชื่อมต่อ ESP8266 เข้ากับ AP โดยหากใช้งาน Function เพียงอย่างเดียว จะเป็นการใช้งาน DHCP โดย ESP8266 จะได้ IP ตามที่ AP เป็นคนจัดสรรให้ หากต้องการใช้งานเป็น static IP ต้องใช้งานร่วมกับ Function config ในคำสั่งต่อไป
Parameter
ssid = ชื่อของ AP ที่ต้องการ join
passphrase = password สำหรับ join เข้า AP
ในกรณีที่ AP ที่ต้องการเชื่อมต่อเป็นแบบ open (ไม่มี password) ให้ใส่แต่ ssid อย่างเดียว เช่น
WiFi.begin(“ThaiEasyElec”);
แบบที่มี Password
WiFi.begin(“ThaiEasyElec”,”passwordxxxx”);
void config(IPAddress local_ip, IPAddress gateway, IPAddress subnet)
เป็น Function สำหรับตั้งค่า IP , gateway , subnet ให้กับ ESP8266 ในกรณีที่ต้องการใช้งานเป็นแบบ Static IP
Parameter
local_ip = สำหรับตั้ง IP
gateway = สำหรับตั้ง gateway
subnet = สำหรับตั้ง subnet
ตัวอย่างการใช้งาน
IPAddress local_ip = {192,168,1,144};
IPAddress gateway = {192,168,1,1};
IPAddress subnet = {255,255,255,0};
WiFi.config(local_ip,gateway,subnet);
int disconnect(void)
เป็น Function สำหรับออกจากการเชื่อมต่อกับ AP
ตัวอย่าง Code การใช้เชื่อมต่อกับ AP แบบ DHCP
#include <ESP8266WiFi.h>
const char* ssid     = "your-ssid";         //อย่าลืมแก้เป็นชื่อ SSID  ของตัวเอง
const char* password = "your-password"; //อย่าลืมแก้เป็นชื่อ password ของตัวเอง
void setup()
{
    Serial.begin(115200);   //ตั้งค่าใช้งาน serial ที่ baudrate 115200
    delay(10);
    Serial.println();
    Serial.println();
    Serial.print("Connecting to "); //แสดงข้อความ  "Connecting to"
    Serial.println(ssid);       //แสดงข้อความ ชื่อ SSID
    WiFi.begin(ssid, password); // เชื่อมต่อไปยัง AP

    while (WiFi.status() != WL_CONNECTED)   //รอจนกว่าจะเชื่อมต่อสำเร็จ
{
            delay(500);
            Serial.print(".");
    }
    Serial.println("");
    Serial.println("WiFi connected");   //แสดงข้อความเชื่อมต่อสำเร็จ
  Serial.println("IP address: ");
  Serial.println(WiFi.localIP());   //แสดงหมายเลข IP ของ ESP8266(DHCP)
}
void loop() {}
– ทดลอง Compile และ Upload ลงไปบน NodeMCU (อย่าลืม แก้ SSID กับ Password เป็นของตัวเองก่อนนะครับ แล้วก็ที่ Serial Monitor เป็น Baud Rate 115200 นะครับ)
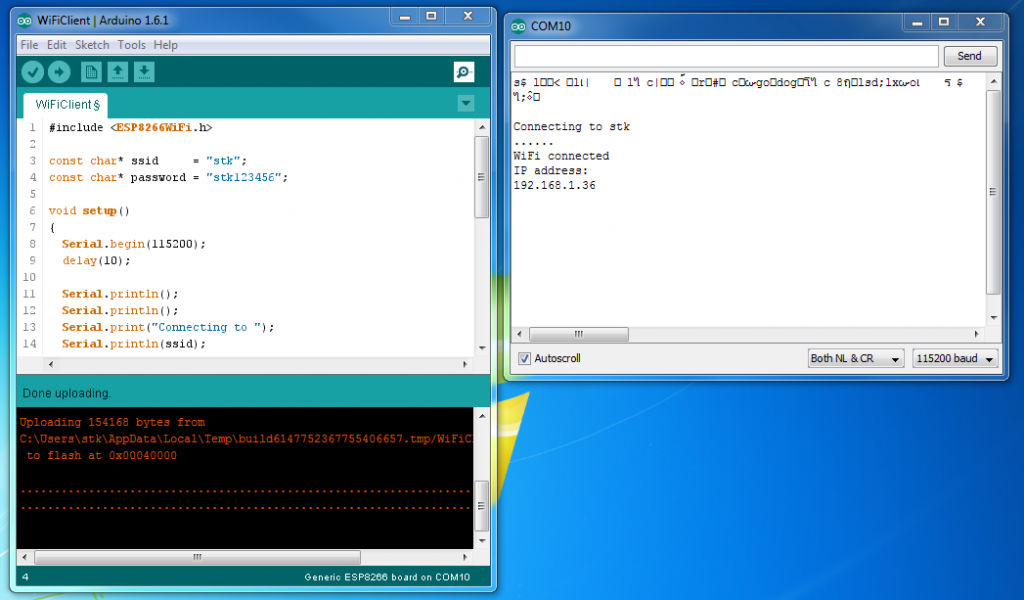
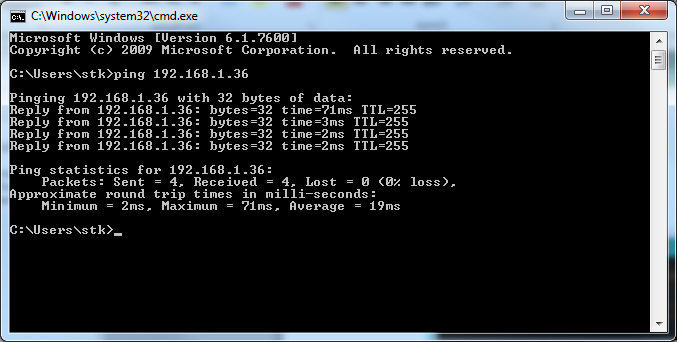
– ทดลอง Ping ไปที่ IP ของ ESP8266
ตัวอย่าง Code การใช้เชื่อมต่อกับ AP แบบ Static IP
#include <ESP8266WiFi.h>
const char* ssid     = "your-ssid";         //อย่าลืมแก้เป็นชื่อ SSID  ของตัวเอง
const char* password = "your-password"; //อย่าลืมแก้เป็นชื่อ password ของตัวเอง
void setup()
{
    Serial.begin(115200);   //ตั้งค่าใช้งาน serial ที่ baudrate 115200
    delay(10);
    Serial.println();
    Serial.println();
    Serial.print("Connecting to "); //แสดงข้อความ  "Connecting to"
    Serial.println(ssid);       //แสดงข้อความ ชื่อ SSID
    WiFi.begin(ssid, password); // เชื่อมต่อไปยัง AP

    while (WiFi.status() != WL_CONNECTED)   //รอจนกว่าจะเชื่อมต่อสำเร็จ
{
            delay(500);
            Serial.print(".");
    }

IPAddress local_ip = {192,168,1,144};   //ตั้งค่า IP
    IPAddress gateway={192,168,1,1};    //ตั้งค่า IP Gateway
    IPAddress subnet={255,255,255,0};   //ตั้งค่า Subnet
    WiFi.config(local_ip,gateway,subnet);   //setค่าไปยังโมดูล

    Serial.println("");
    Serial.println("WiFi connected");   //แสดงข้อความเชื่อมต่อสำเร็จ
    Serial.println("IP address: ");
    Serial.println(WiFi.localIP()); //แสดงหมายเลข IP ของ ESP8266
}
void loop() {}
– ทดลอง Compile และ Updolad ลงไปบน ESP8266

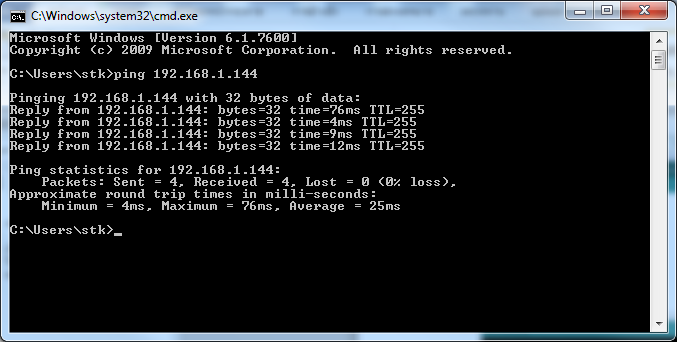
– ทดลอง ping ไปที่ IP ของ ESP8266