
24 วินาที ล้างมือ ปลอยภัยห่างไกล COVID-19 ด้วย Arduino
“อโรคยา ปรมาลาภา” หรือ ความไม่มีโรค เป็นลาภอันประเสริฐ เป็นหนึ่งในพุทธวจนของพระพุทธเจ้าในศาสนาพุทธ ซึ่งไม่ว่าเวลาจะผ่านไปนานเท่าไรยังสามารถใช้ได้สำหรับทุกยุคทุกสมัย ยิ่งในช่วงปัจจุบันในช่วงที่เกิดการระบาดของไวรัสโคโรนาสายพันธุ์ใหม่ หรือ COVID-19 ที่ทำให้ผู้ป่วยมีอาการเกี่ยวกับระบบทางเดินหายใจ เเละยังสามารถเเพร่กระจายจากคนสู่คนได้จากการไอ การจาม หรือการสัมผัสสารคัดหลั่งของผู้ติดเชื้อ ซึ่งภายในช่วงระยะฟักตัวของเชื้อนั้นจะยังไม่มีอาการเเต่อย่างใด
เนื่องจาก COVID-19 นั้นสามารถเเพร่กระจายได้จากหลากหลายกรณี ดังนั้นเราควรป้องกันตัวเองให้ ปลอดภัยจาก COVID-19 ด้วยการสวมหน้ากากอนามัย เเละพยายามล้างมือบ่อยๆ เพื่อเป็นการป้องกันไม่ให้ไวรัสชนิดนี้เข้าสู่ร่างกาย โดยภายในบทความนี้จะนำบอร์ดไมโครคอนโทรเลอร์ยอดฮิตอย่าง Arduino ผนวกเข้ากับเซ็นเซอร์วัดระยะอย่าง Ultra-Sonic เเละ RGB LED เเบบวงกลม มาเป็นตัวนับเวลาขณะที่เราทำการล้างมือประมาณ 24 วินาที (โดยปกติควรจะล้างประมาณ 20-30 วินาที เเละเนื่องจากบทความนี้ใช้ LED 24 ดวง ดังนั้นจึงออกมาเป็น 24 วินาที) เพื่อให้เราใช้เวลาที่เหมาะสมในการล้างมือให้ครบทุกขั้นตอนไม่ให้เร็วเกินไป โดยเราสามารถดูขั้นตอนต่างๆ ได้ดังรูป 6 ขั้นตอน ล้างมืออย่างถูกวิธีปราศจากโรคภัย

[อ้างอิงรูปภาพจาก โรงพยาบาลศรีนครินทร์]
อุปกรณ์ที่ใช้
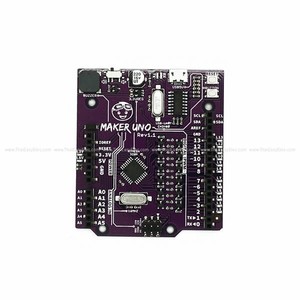
1. Cytron Maker UNO (EFDV697) จำนวน 1 pcs บอร์ด Maker-UNO (Arduino Compatible) จากค่าย Cytron ถูกออกแบบมาให้ใช้งานง่ายมี on board LED เพิ่มมาถึง 12 ดวง และยังมีปุ่มกดกับ Piezo Buzzer เพื่อให้การใช้งานง่ายยิ่งขึ้น
2. 24 x WS2812 RGB LED (Ring) (EFDV487) จำนวน 1 pcs วงแหวน RGB LED 24 ดวง เส้นผ่านศูนย์กลางภายนอกวงแหวน 66mm ใช้ไฟเลี้ยง 5VDC แต่ละ LED รับกระแสคงที่ 18mA bit สีของ LED

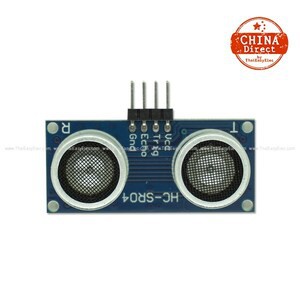
3. HC-SR04P Ultrasonic Sensor (EFDV672) จำนวน 1 pcs โมดูล HC-SR04P อัลตร้าโซนิกส์ ระยะตรวจจับ 2 เซนติเมตร ถึง 4 เมตร ทำงานที่แรงดัน 3-5V ส่งสัญญาณสั่งงานไป Trig และรับสัญญาณ Echo กลับเข้ามาประมวลผล สื่อสารผ่าน GPIO
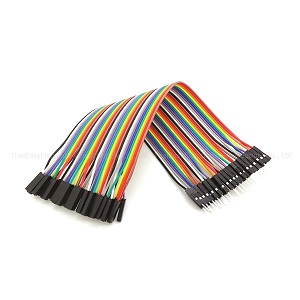
4. Male to Female Cable Jumper Wire 40 Pins (ผู้-เมีย) (ELNK054) จำนวน 1 pcs สาย Jumper Wire แบบสายแพ สามารถฉีกออกเป็นเล็กได้ 40 เส้น ความยาวสาย 20 cm ปลายด้านนึงเป็น pin header ตัวผู้ อีกด้านเป็น header ตัวเมีย
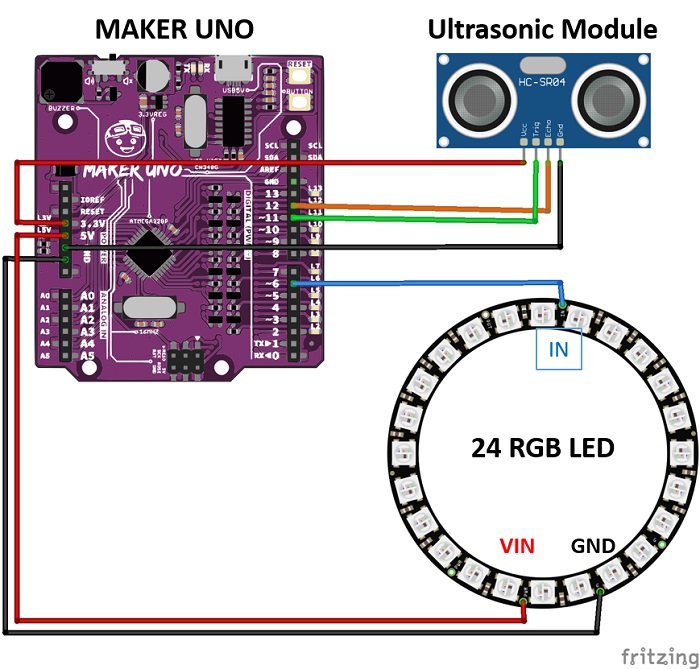
เนื่องจากบทความนี้ใช้งานบอร์ด Maker Uno, 24 RGB LED เเละ Ulltrasonic Module ร่วมกัน ดังนั้นจำเป็นต้องต่อบอร์ดเข้าด้วยกันดังรูป ใช้งาน Arduino ร่วมกับ Ultrasonic เเละ 24 RGB LED
บทความนี้ใช้งานบอร์ด Arduino ในการควบคุมการทำงานของอุปกรณ์เเละใช้โปรเเกรม Arduino IDE ในการพัฒนาโปรเเกรม หากยังไม่รู้จักบอร์ด Arduino สามารถอ่านเพิ่มเติมได้ที่
>> บทความ Arduino คืออะไร? ตอนที่1 แนะนำเพื่อนใหม่ที่ชื่อ Arduino <<
ไลบรารี่ที่จำเป็นต้องติดตั้งเพิ่มเติม
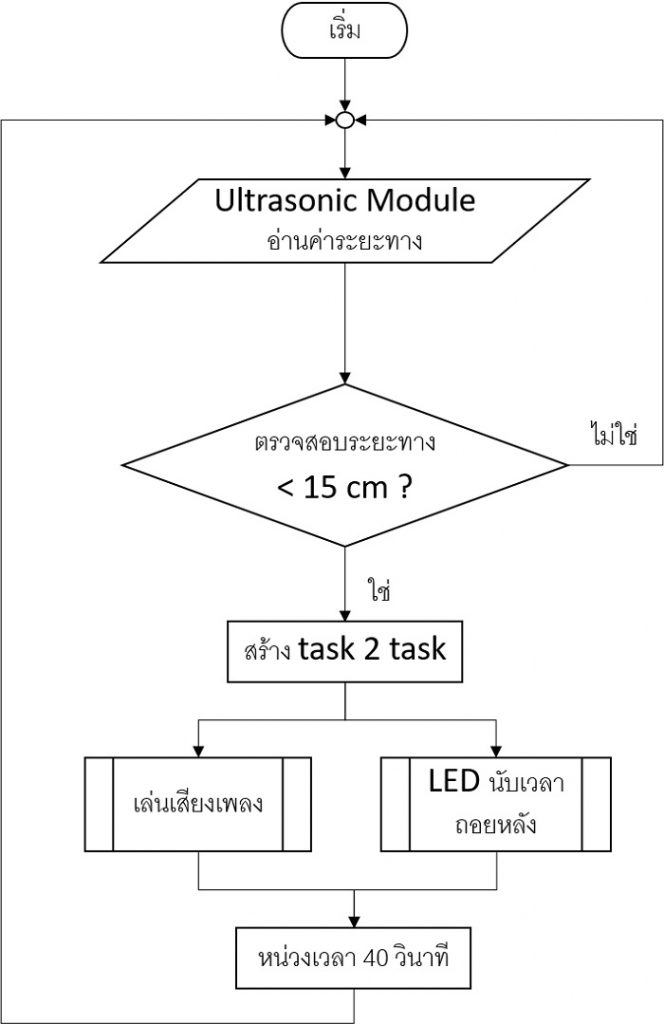
หลังจากติดตั้งไลบรารี่สำเร็จเเล้ว ขั้นตอนต่อไปคือทำความเข้าใจหลักการทำงานของโปรเเกรม โดยสามารถดูได้จากรูป Flowchart หลักการทำงานของโปรเเกรม
โปรเเกรมที่ใช้
#include <Arduino_FreeRTOS.h>

// define two tasks for Buzzer & LED
void TaskBuzzer( void *pvParameters );
void TaskLED( void *pvParameters );

// the setup function runs once when you press reset or power the board
#define NOTE_B0  31
#define NOTE_C1  33
#define NOTE_CS1 35
#define NOTE_D1  37
#define NOTE_DS1 39
#define NOTE_E1  41
#define NOTE_F1  44
#define NOTE_FS1 46
#define NOTE_G1  49
#define NOTE_GS1 52
#define NOTE_A1  55
#define NOTE_AS1 58
#define NOTE_B1  62
#define NOTE_C2  65
#define NOTE_CS2 69
#define NOTE_D2  73
#define NOTE_DS2 78
#define NOTE_E2  82
#define NOTE_F2  87
#define NOTE_FS2 93
#define NOTE_G2  98
#define NOTE_GS2 104
#define NOTE_A2  110
#define NOTE_AS2 117
#define NOTE_B2  123
#define NOTE_C3  131
#define NOTE_CS3 139
#define NOTE_D3  147
#define NOTE_DS3 156
#define NOTE_E3  165
#define NOTE_F3  175
#define NOTE_FS3 185
#define NOTE_G3  196
#define NOTE_GS3 208
#define NOTE_A3  220
#define NOTE_AS3 233
#define NOTE_B3  247
#define NOTE_C4  262
#define NOTE_CS4 277
#define NOTE_D4  294
#define NOTE_DS4 311
#define NOTE_E4  330
#define NOTE_F4  349
#define NOTE_FS4 370
#define NOTE_G4  392
#define NOTE_GS4 415
#define NOTE_A4  440
#define NOTE_AS4 466
#define NOTE_B4  494
#define NOTE_C5  523
#define NOTE_CS5 554
#define NOTE_D5  587
#define NOTE_DS5 622
#define NOTE_E5  659
#define NOTE_F5  698
#define NOTE_FS5 740
#define NOTE_G5  784
#define NOTE_GS5 831
#define NOTE_A5  880
#define NOTE_AS5 932
#define NOTE_B5  988
#define NOTE_C6  1047
#define NOTE_CS6 1109
#define NOTE_D6  1175
#define NOTE_DS6 1245
#define NOTE_E6  1319
#define NOTE_F6  1397
#define NOTE_FS6 1480
#define NOTE_G6  1568
#define NOTE_GS6 1661
#define NOTE_A6  1760
#define NOTE_AS6 1865
#define NOTE_B6  1976
#define NOTE_C7  2093
#define NOTE_CS7 2217
#define NOTE_D7  2349
#define NOTE_DS7 2489
#define NOTE_E7  2637
#define NOTE_F7  2794
#define NOTE_FS7 2960
#define NOTE_G7  3136
#define NOTE_GS7 3322
#define NOTE_A7  3520
#define NOTE_AS7 3729
#define NOTE_B7  3951
#define NOTE_C8  4186
#define NOTE_CS8 4435
#define NOTE_D8  4699
#define NOTE_DS8 4978
int melody[] = {
  NOTE_A4, NOTE_G4, NOTE_G4, NOTE_G4, NOTE_E5, NOTE_G5, NOTE_E5, NOTE_D5, NOTE_E5,
  NOTE_G5, NOTE_E5, NOTE_D5, NOTE_E5, NOTE_G5, NOTE_E5, NOTE_D5, NOTE_C5, NOTE_D5, NOTE_E5,
  NOTE_A4, NOTE_G4, NOTE_G4, NOTE_G4, NOTE_E5, NOTE_G5, NOTE_E5, NOTE_D5, NOTE_E5,
  NOTE_G5, NOTE_E5, NOTE_D5, NOTE_E5, NOTE_G5, NOTE_E5, NOTE_D5, NOTE_C5, NOTE_D5, NOTE_C5, 0,
  NOTE_D5, NOTE_D5, NOTE_E5, NOTE_D5, NOTE_C5, NOTE_D5, 0,
  NOTE_E5, NOTE_D5, NOTE_C5, NOTE_D5, NOTE_E5, NOTE_D5, NOTE_C5, NOTE_B4, NOTE_A4, NOTE_G4, NOTE_A4, NOTE_B4, NOTE_A4, NOTE_B4, NOTE_C5, NOTE_D5, 0,
  NOTE_D5, NOTE_D5, NOTE_E5, NOTE_D5, NOTE_C5, NOTE_D5, 0,
  NOTE_E5, NOTE_D5, NOTE_C5, NOTE_D5, NOTE_E5, NOTE_C5, NOTE_D5, NOTE_E5, NOTE_G5, NOTE_E5, NOTE_D5, NOTE_C5, NOTE_D5, NOTE_C5, NOTE_B4, NOTE_A4
};

// note durations: 4 = quarter note, 8 = eighth note, etc.:
int noteDurations[] = {
  4, 8, 8, 4, 3, 8, 3, 8, 3,
  8, 3 , 8, 8, 8, 8 , 8, 4, 4, 4,
  4, 8, 8, 4, 3, 8, 3, 8, 3,
  8, 3 , 8, 8, 8, 8 , 8, 4, 4, 2, 4,
  4, 4, 4, 8, 8, 4, 8,
  8, 8, 8, 8, 8, 8, 8, 8, 8, 8, 8, 8, 8, 8, 8, 2, 4,
  4, 4, 4, 8, 8, 4, 8,
  8, 8, 8, 8, 8, 8, 8, 8, 8, 8, 8, 8, 8, 8, 8, 2
};

#include <Adafruit_NeoPixel.h>
#ifdef __AVR__
#include <avr/power.h>
#endif
#define PIN        6
#define NUMPIXELS 24
Adafruit_NeoPixel pixels(NUMPIXELS, PIN, NEO_GRB + NEO_KHZ800);


const int trigPin = 11;
const int echoPin = 12;
long duration;
int distance;

void setup() {
#if defined(__AVR_ATtiny85__) && (F_CPU == 16000000)
  clock_prescale_set(clock_div_1);
#endif
  pixels.begin(); // INITIALIZE NeoPixel strip object (REQUIRED)

  Serial.begin(9600);
  pinMode(trigPin, OUTPUT); // Sets the trigPin as an Output
  pinMode(echoPin, INPUT); // Sets the echoPin as an Input
  delay(1000);
}

void loop()
{

  digitalWrite(trigPin, LOW);  // Clears the trigPin
  delayMicroseconds(2);
  digitalWrite(trigPin, HIGH); // Sets the trigPin on HIGH state for 10 micro seconds
  delayMicroseconds(10);
  digitalWrite(trigPin, LOW);
  duration = pulseIn(echoPin, HIGH); // Reads the echoPin, returns the sound wave travel time in microseconds
  distance = duration * 0.034 / 2;   // Calculating the distance
  Serial.print("Distance: "); // Prints the distance on the Serial Monitor
  Serial.println(distance);

  if (distance <= 10)
  {
    xTaskCreate(TaskBuzzer, "Buzzer", 128, NULL, 2, NULL);
    xTaskCreate(TaskLED, "LED", 128, NULL, 2, NULL);
    delay(40000);
  }
}

/*---------------------- Tasks ---------------------*/

void TaskBuzzer(void *pvParameters)  // This is a task.
{
  (void) pvParameters;
  Serial.println("IN Task Buzzer");
  tone (8, 1000);
  vTaskDelay( 1000 / portTICK_PERIOD_MS ); // wait for one second
  noTone(8);
  vTaskDelay( 500 / portTICK_PERIOD_MS ); // wait for one second
  tone (8, 1000);
  vTaskDelay( 1000 / portTICK_PERIOD_MS ); // wait for one second
  noTone(8);
  vTaskDelay( 500 / portTICK_PERIOD_MS ); // wait for one second

  for (int thisNote = 0 ; thisNote < 86 ; thisNote++) {
    int noteDuration = 1000 / noteDurations[thisNote];
    tone (8, melody[thisNote], noteDuration);
    int pauseBetweenNotes = noteDuration * 1.30;
    vTaskDelay( pauseBetweenNotes / portTICK_PERIOD_MS ); // wait for one second
    noTone(8);
  }
  vTaskDelete(NULL);
}

void TaskLED(void *pvParameters)  // This is a task.
{
  (void) pvParameters;
  Serial.println("IN Task LED");
  pixels.clear();
  for (int i = 0; i < NUMPIXELS; i++) { // For each pixel...
    pixels.setPixelColor(i, pixels.Color(150, 0, 0));
    pixels.show();
  }
  pixels.clear();
  vTaskDelay(1000 / portTICK_PERIOD_MS);
  for (int i = 0; i < NUMPIXELS-1; i++) { // For each pixel...
    pixels.setPixelColor(i, pixels.Color(150, 150, 0));
    pixels.show();
  }
  vTaskDelay(1000 / portTICK_PERIOD_MS);

  pixels.clear();
  for (int i = 0; i < NUMPIXELS - 2; i++) { // For each pixel...
    pixels.setPixelColor(i, pixels.Color(0, 150, 0));
    pixels.show();   // Send the updated pixel colors to the hardware.
  }

  for (int i = NUMPIXELS - 2; i >= 0; i--) { // For each pixel...
    pixels.setPixelColor(i, pixels.Color(0, 0, 0));
    pixels.show();   // Send the updated pixel colors to the hardware.
    vTaskDelay(1000 / portTICK_PERIOD_MS);
  }
  vTaskDelete(NULL);
}
เพียงเท่านี้ก็จะได้เครื่องนับเวลา 24 วินาที ล้างมือ ปลอยภัยห่างไกล Covid-19 ด้วย Arduino มาไว้ใช้งาน ที่สำคัญอย่าลืมหากล่องมาใส่เเล้วตกเเต่งให้เกิดความสวยงามตามใจต้องการ
>>ด้วยความห่วงใยจากทีมงาน ThaiEasyElec<<
ถึงเเม้ว่าสถานการณ์ของโรค COVID-19 จะดีขึ้นเครื่องนี้ก็ยังสามารถใช้งานได้ต่อไป เพราะการล้างมือนั้นป้องกันโรคต่างๆได้อีกมากมาย ฉะนั้นเเล้ว รักสุขภาพ อย่าลืมล้างมือบ่อยๆ นะครับ
ขอขอบคุณข้อมูลอ้างอิง รูปภาพเเละไลบรารี่จาก
– https://www.sikarin.com
– Arduino_FreeRTOS_Library
– Adafruit_NeoPixel_Library
– Kangkaw_Kin_Kluay_arduino_code
หากลูกค้าสนใจข้อมูลอุปกรณ์ในโครงงานนี้ สามารถสั่งซื้ออุปกรณ์ได้ทางหน้า เว็ปไซต์ หรือสอบถามเข้ามาได้ที่อีเมล sales@thaieasyelec.com หรือทางโทรศัพท์ 02-954-2408 และ 089-514-8111 รวมทั้งทาง LINE @thaieasyelec หรือทางเฟซบุค fb.com/ThaiEasyElec